Sidebar
Table of Contents
DAX Home Automation
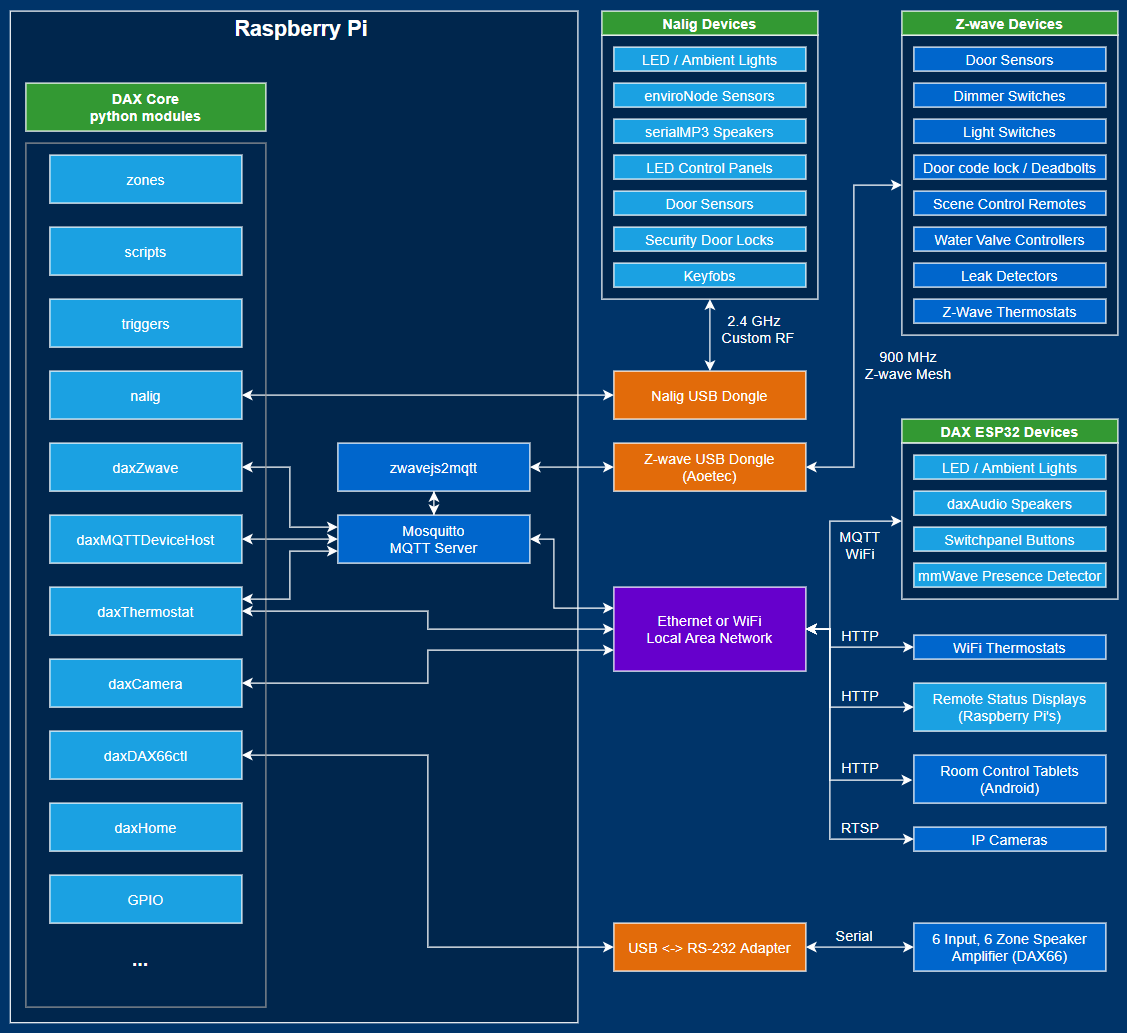
DAX is a custom home automation platform that I have been developing since 2015. I wanted to create, control and customize as much of the entire system stack as I could handle, from hardware to software. The core runs on Python 3.11 on a Raspberry Pi, and with WiFi or Ethernet devices can communicate over HTTP or MQTT. USB Dongles provide additional connectivity to Z-wave and Nalig devices over a custom 2.4 GHz protocol. I build a variety of sensors and devices using an ESP32 and those devices communicate with MQTT over WiFi. In addition to devices that I’ve built, DAX will also talk to most standard Z-wave devices using zwavejs2mqtt and other devices with an open HTTP API. An MQTT server is required to use MQTT devices, and Mosquitto generally works well.
The web front end is written in HTML and JavaScript and is viewed on Android tablets mounted to the wall, some Raspberry Pi displays, and a web browser on computer / phone.
Background
When I was building my apartment security system, I found myself re-writing too much code to maintain common elements like configuration, variables, interface, web API, event management, logging, and more. As I was adding support for new kinds of devices and services, I wanted a standard way to provide that so that module code could focus only on exactly what is required.
Like the previous system, offline functionality is a core philosophy of DAX. Although it relies on internet access for updated information (weather, remote sensors, other commercial products with an open remote API), the system must operate entirely without internet access.
Block Diagram
Core Architecture
The core of DAX is a module and item structure that makes it easy to add modules with built-in support. Modules can have configuration fields, variables, functions, interact with other modules using events and triggers, and contain their own web interface HTML files. Modules also contain an array of items, another type of data structure in DAX.
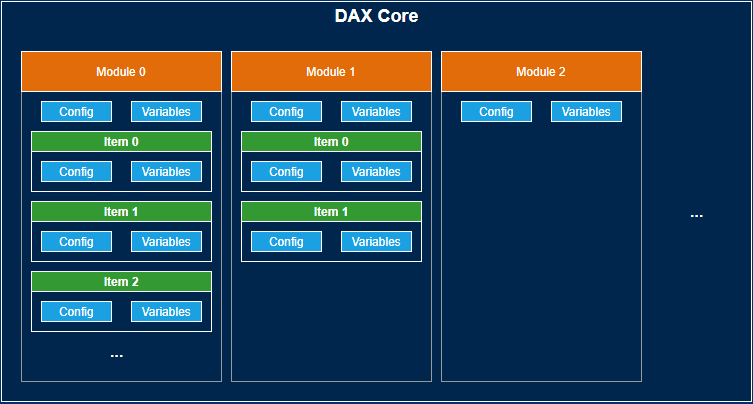
Items
Items also contain their own configuration fields, variables, and functions. Items can trigger events. Items typically represent a device. For example, the Z-wave modules contain an item for each z-wave device in the network. The thermostat module contains an item for each thermostat configured. Items also are used to represent other objects in the DAX system like scripts, triggers, zones.
Module Inheritance
Module inheritance makes it easy to connect common features from related modules. As another example, there is a base daxMQTT module that provides basic functionality for connection to an MQTT server and the representation of different devices that communicate over different topics. Both the daxMQTTdeviceHost and Z-wave modules inherit this module to gain this basic functionality.
Using Modules
Adding modules to a DAX system requires the following:
- If this is a new module, modify load_module() daxCore.py:
- add the module name key to the list, (for example, moduleName)
- Add an import statement for the module’s Python file name (import moduleName from module_name.py
- Update configuration to dax.cfg to include a key for the module name, and add any required configuration settings
- Include the moduleName.py python file
- Add web interface HTML files to the folder web/mod/moduleName
Command Interface and API
DAX has a fully integrated command interface that allows modules to implement custom commands and with a simple parameter/value format that is simple to use with a command line interface, JSON, or an HTTP request. A callback function can be defined in the module’s Python code to define module specific functions.
The text command format is used in scripts and in the debug command line.
[module].[cmd] [param1] [value1] [param2] [value2]
The JSON format is used internally in DAX and on the web interface.
{
“module”: “module”,
“cmd”: “cmd”,
“param1”: “value1”,
“param2”: “value2”,
}
The HTTP request format is used on the web interface or with remote panels.
dax.local/module.cmd?param1=value1¶m2=value2
As a real example, to control a serialMP3 device to play a sound, the command could be represented as follows: As a text command:
nalig.playsound addr 20 soundnum 15 vol 7
As JSON:
{
“module”: “nalig”,
“cmd”: “playsound”
“addr”: 20,
“soundnum”: 15,
“vol” : 12
}
As an HTTP request
dax.local/nalig.playsound?addr=20&soundnum=15&vol=7
Panel Hardware
The web interface is designed to be viewed in a web browser. It can be used on a phone, laptop, desktop or tablet. Around the house, I originally used Raspberry Pi's with various screens. Eventually, I found a 10“ Android tablet solution with a 3D printed mounting cover. I like the Lenovo Tab M10, the formfactor is very rectangular, and it includes built-in software for battery management. The Lenovo software will charge the battery up to 60%, discharge down to 40%, then repeat. This battery management is important so the tablet can remain plugged in at all times. If the battery was kept charged at 100% at all times, it would eventually swell and burst out of the case.
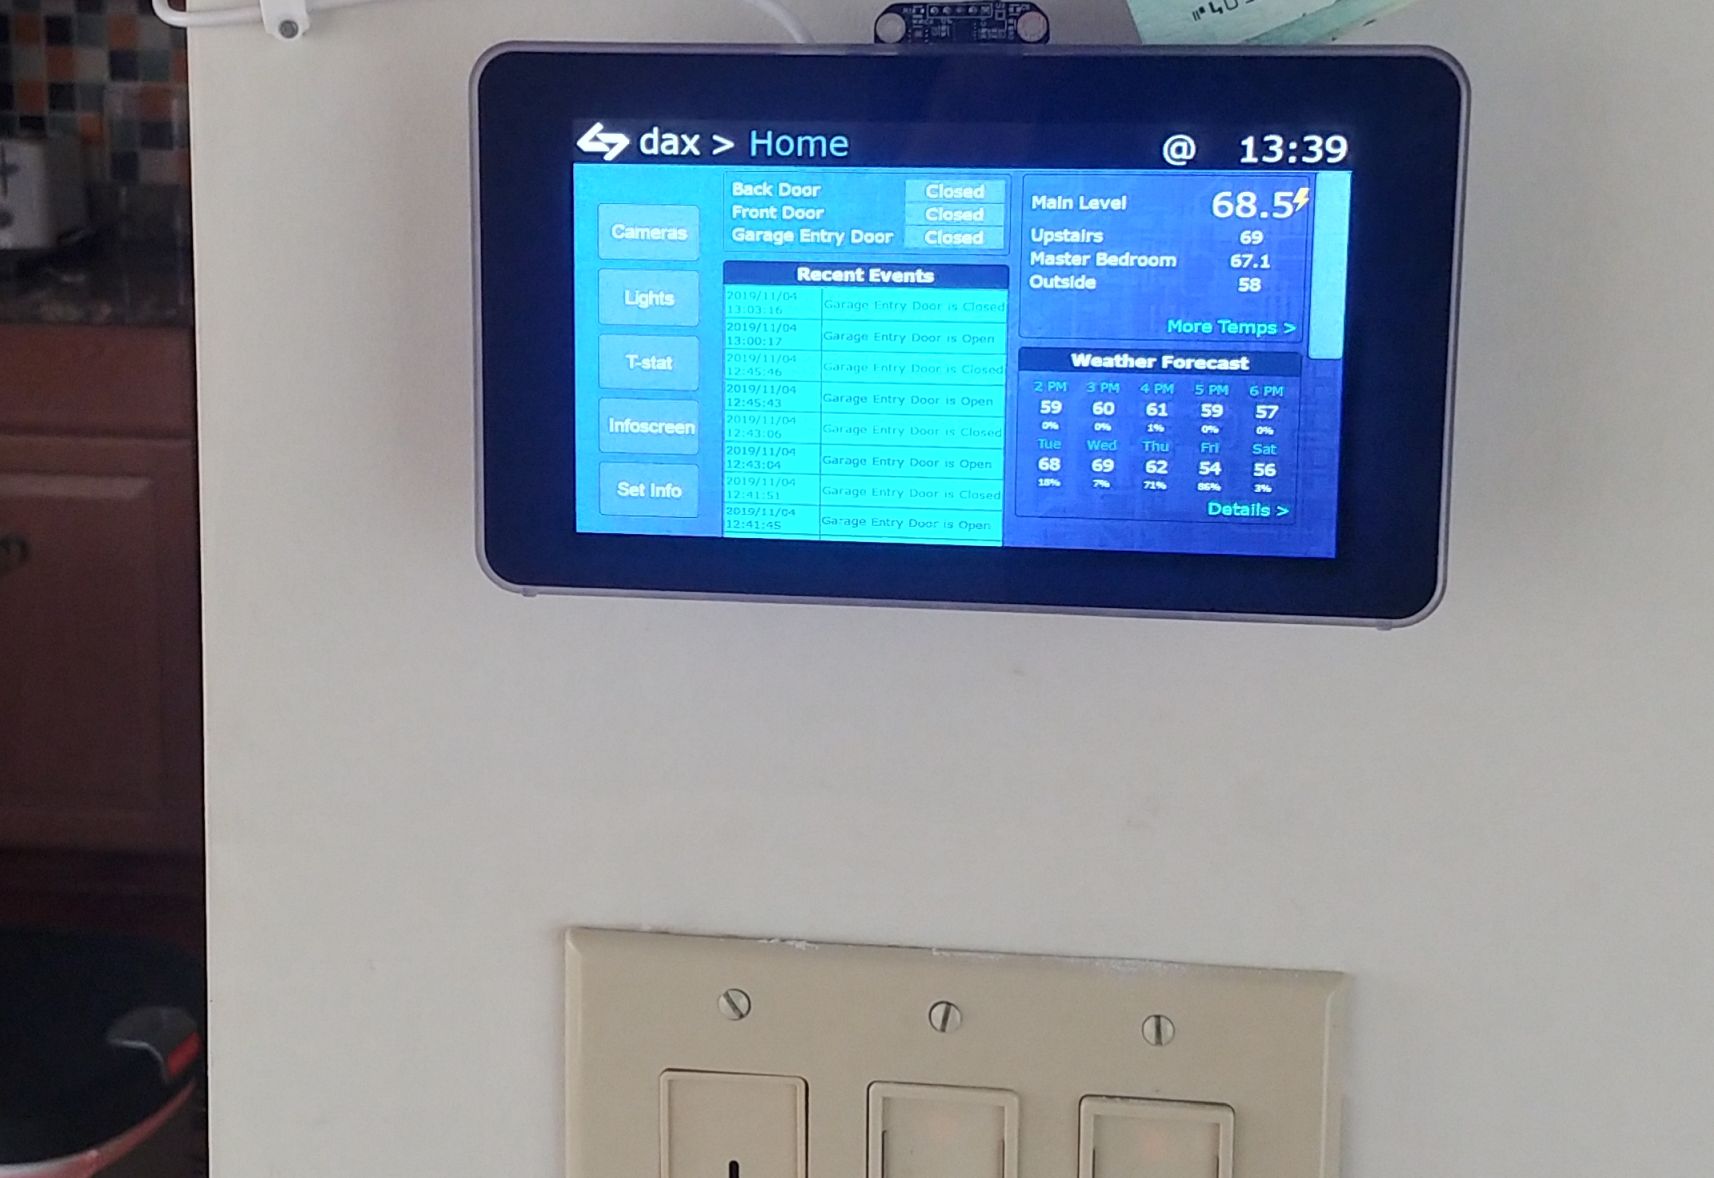
Below are some early DAX panels running on a Raspberry Pi. On the left is an official Raspberry Pi screen, and on the right is an HDMI touchscreen.
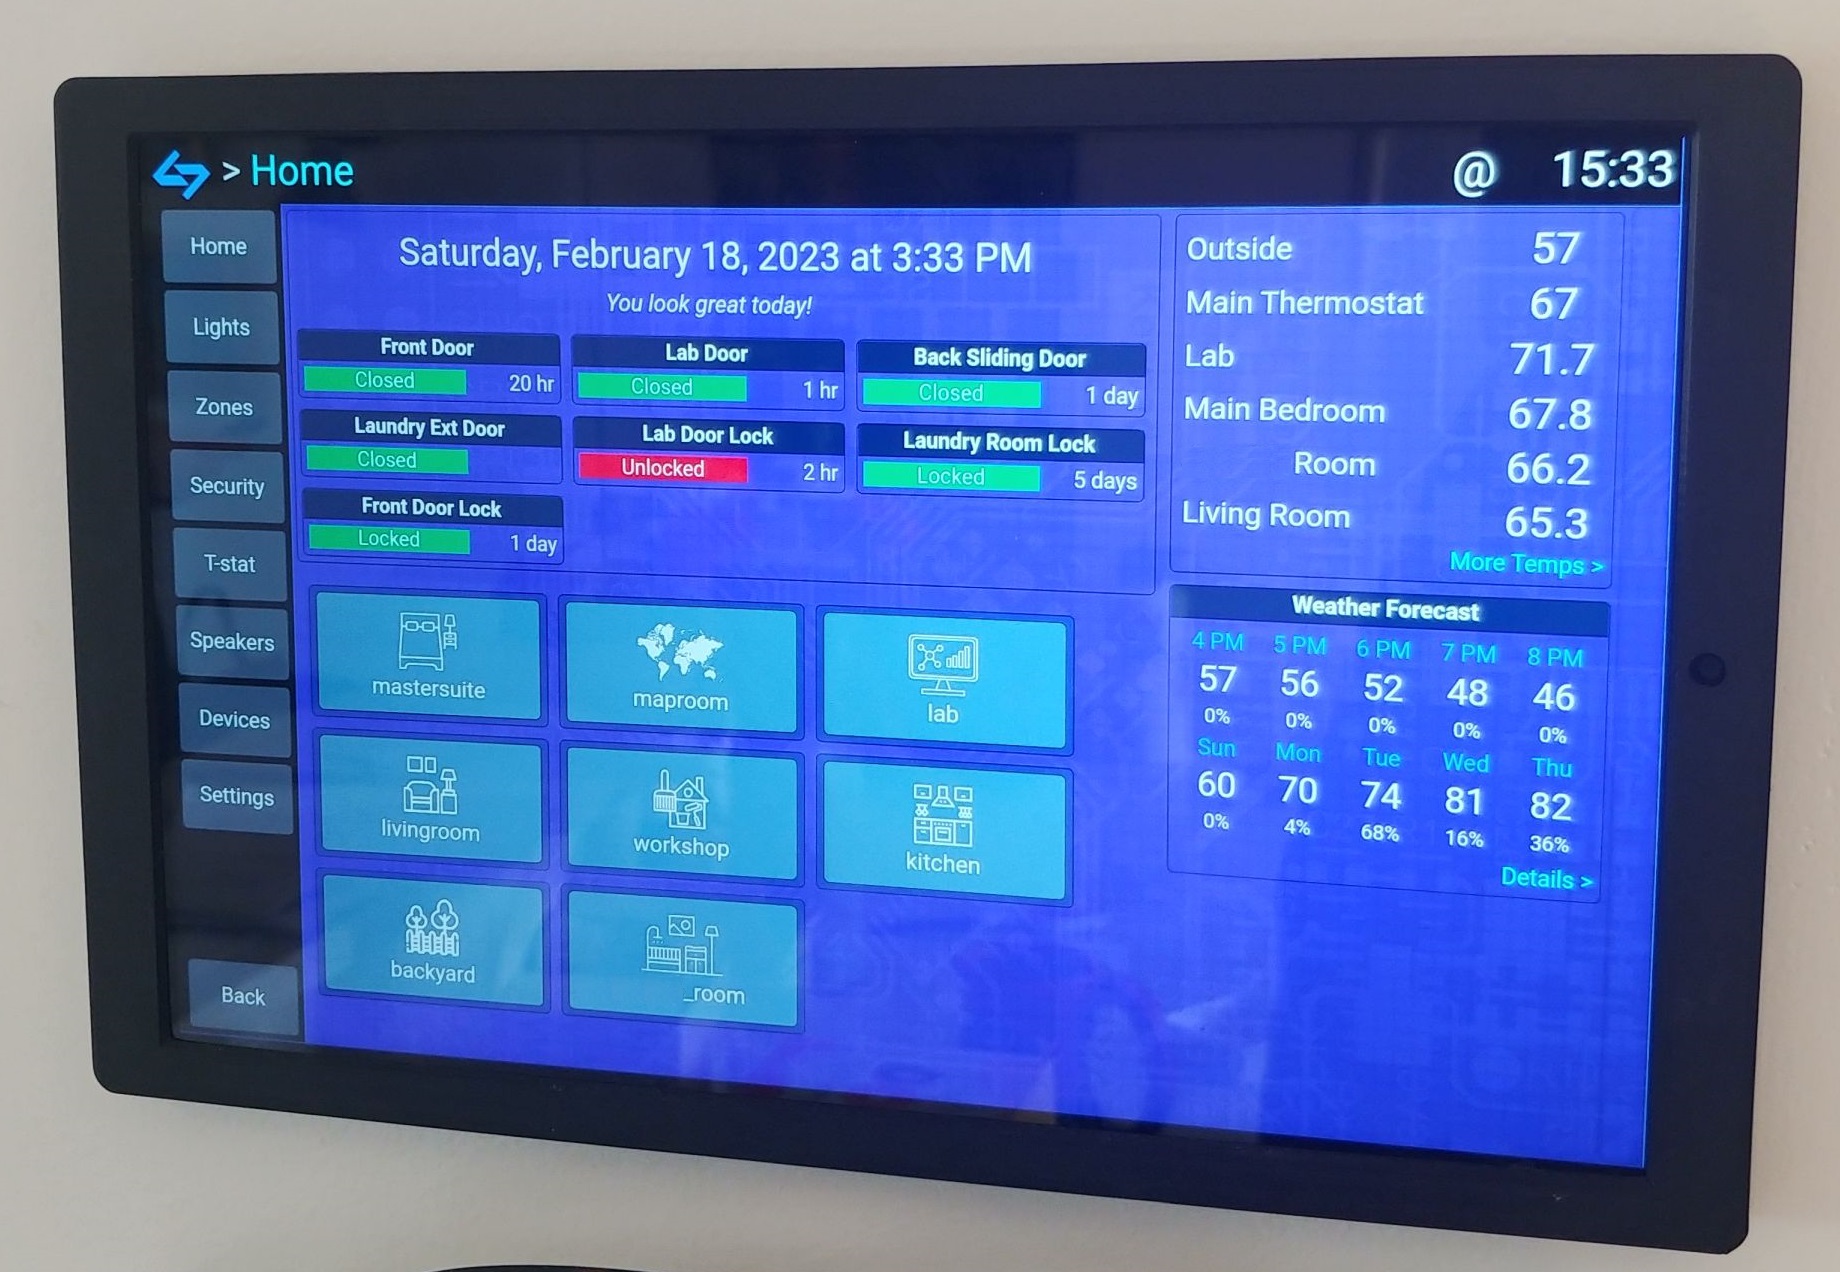
And here is a modern version of the panel using an Android tablet.
Web Interface
The DAX web interface took considerable thought. Initially when I was building this system, I wanted to take an all-hardware approach and design a custom GUI to run on a Raspberry Pi. As cool as this would have been, realistically I knew that I needed an interface that was not only accessible on many types of devices, but also it needed to be easy to modify and easy to add new pages. Eventually I came to senses and decided to build a web interface entirely in HTML and raw JavaScript, with no frameworks.
The internal daxWeb module controls the web server configuration and page routing. The module uses CherryPy to serve web page content and respond to API calls over HTTPS. Currently only basic authentication is used, but I have plans to implement token authentication for better device authentication.
Main Interface
The core DAX web interface contains no content, only the main menu, configuration editor, and variable viewer. This content is included in daxPanel.html, daxFunctions.js, dax.css and a few image files, too.
The main menu has a button to view settings, and a list of all available pages from currently running modules. Each module has code that defines pages names and file names for the page content. An API call to the module can get a list of pages for the module.
Settings
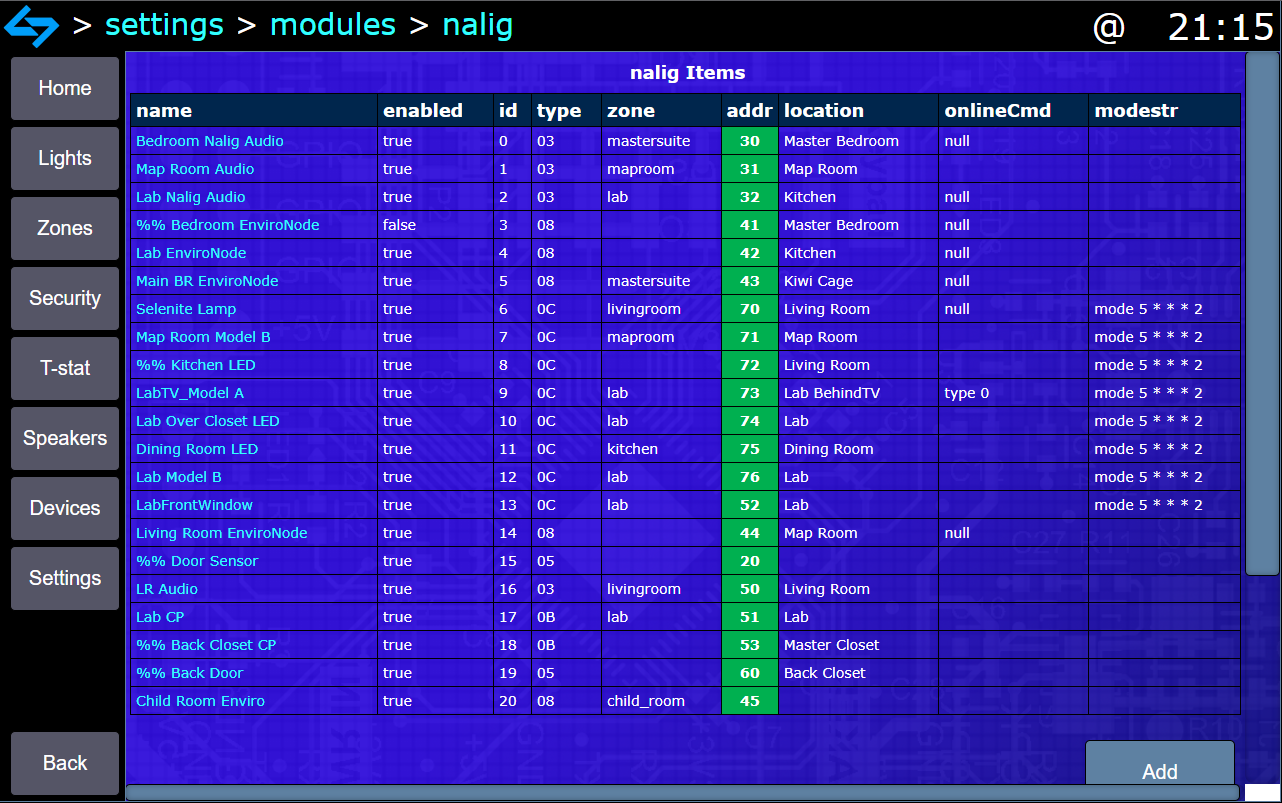
The settings page starts with displaying a list of configured modules. Clicking on a module will go to the module configuration screen, which is split in two halves, the item list and the module configuration fields. The module configuration fields are displayed in a table, and an edit button takes you to the configuration editor screen to edit these fields.

The item list is a list of every item in the module configuration, and some of the key configuration fields (like name, enabled, and ID). Clicking on an item in the list takes you to the configuration editor screen, which has a complete list of each configuration field for the selected module’s items.
The configuration editor screen lets you edit each configuration field for the item. Configuration can be edited in a text box or with a drop-down selector. There are also buttons to to delete or clone the current item configuration as a new item.
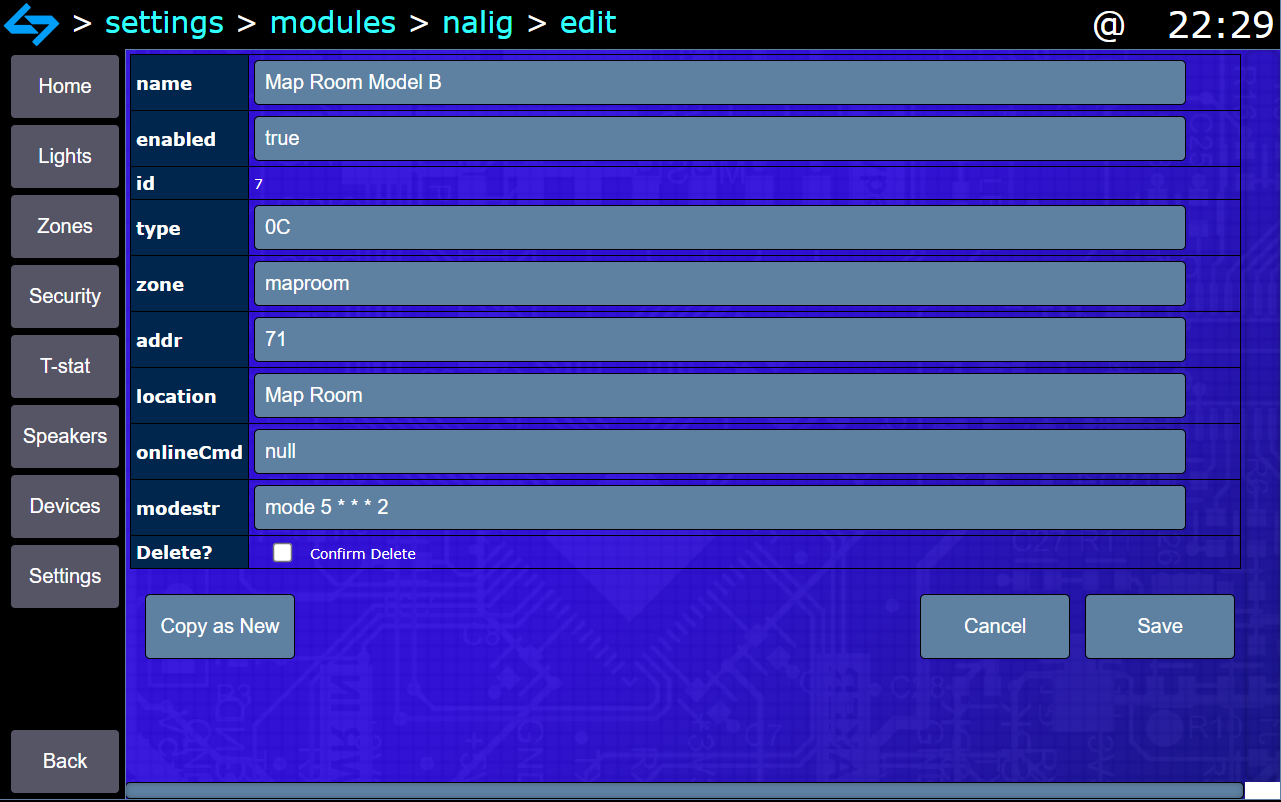
These automatic configuration pages allow easy CRUD (create, rename, update, delete) operations for current and future modules. This is has been a very useful feature - in my previous security system, every new type of object required creating a custom page and manually defining all of the fields that needed to be editable.
Variables
DAX modules and items can both create and update variables. The variable view screen allows you to select a module and view all of that module’s current variables, values, and when they were last updated.

daxHome Module
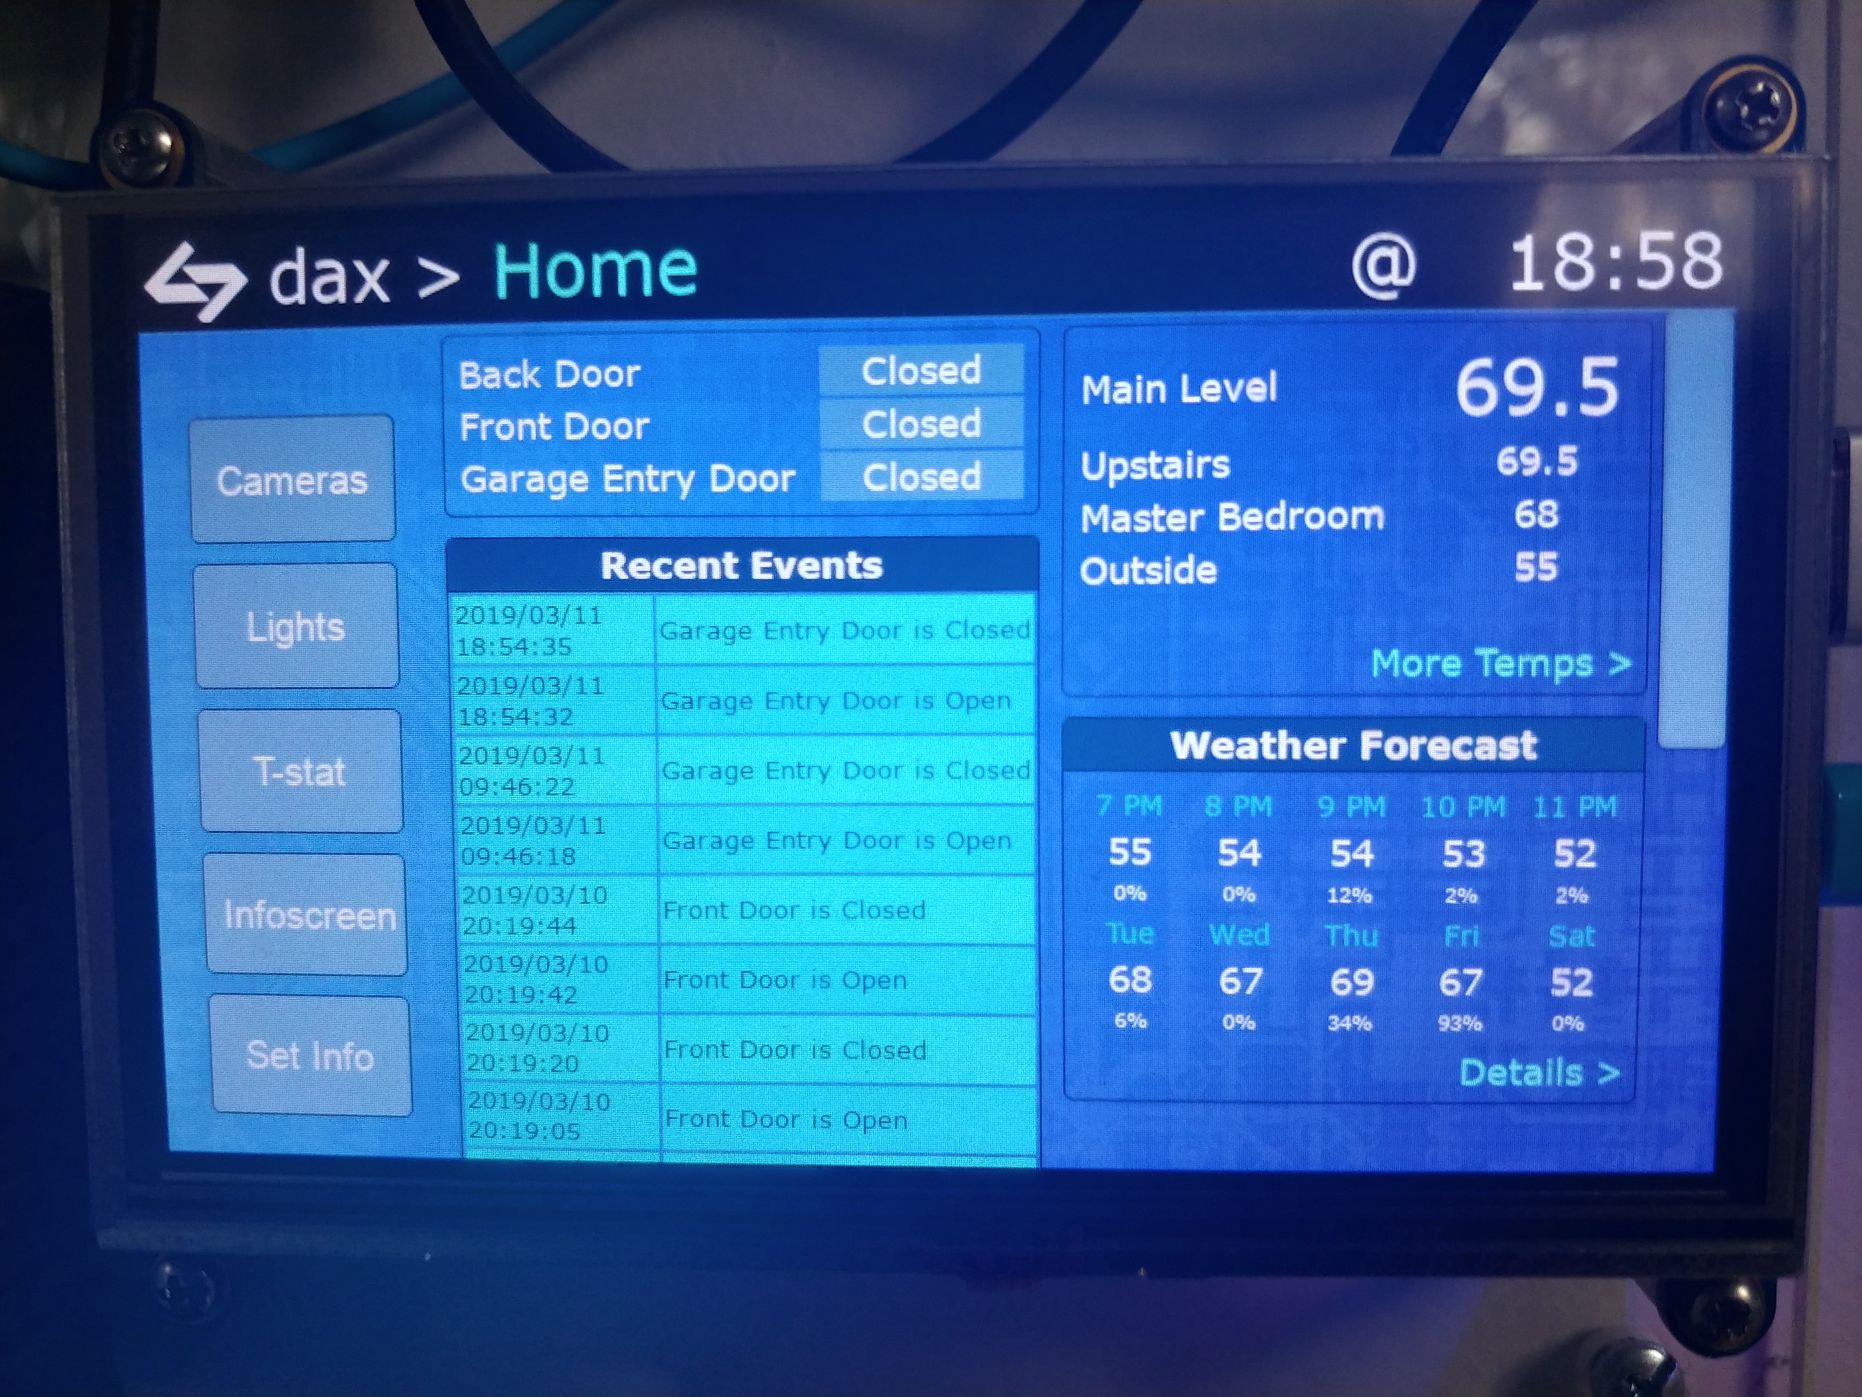
The daxHome module was made as a “catch-all” module to host web interface pages that don’t really fit in other modules. The module also contains a variety
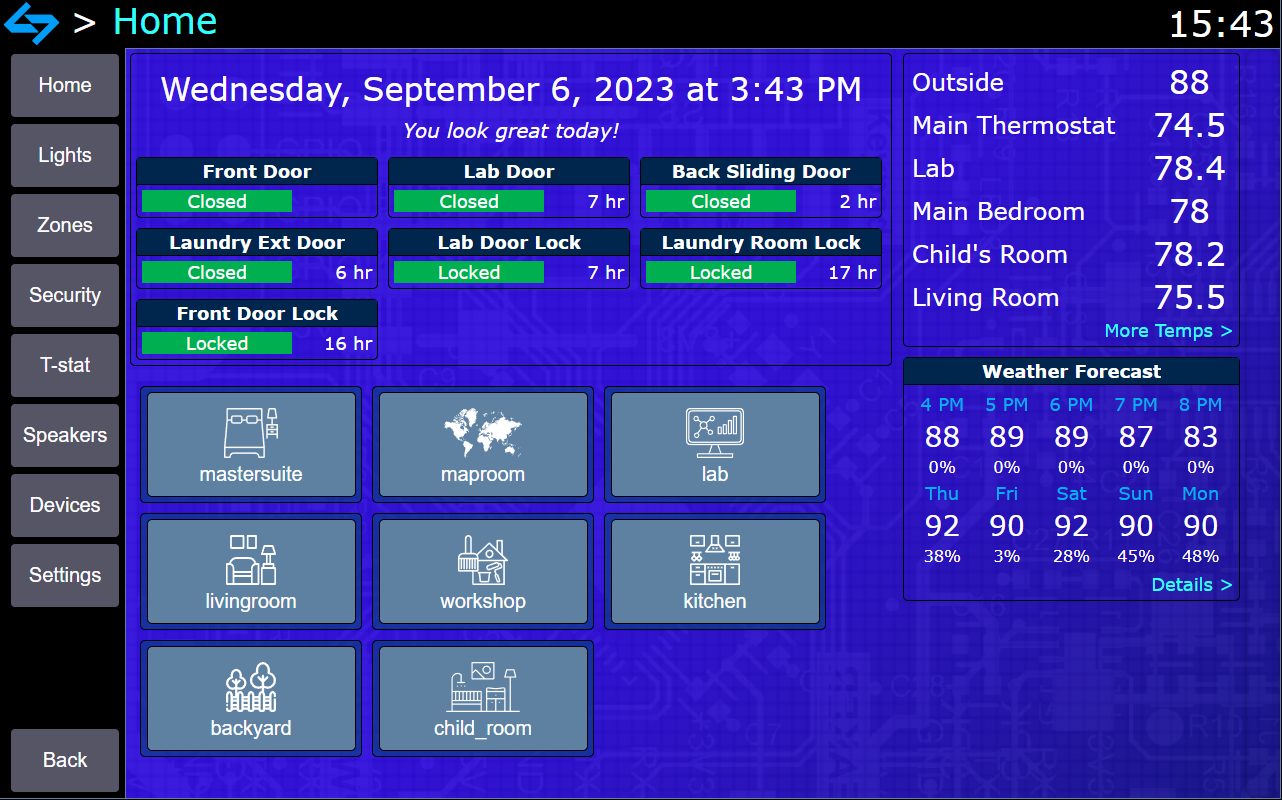
For example, the daxHome module hosts pages for the tablet’s “home” screen, recent events, environmental monitoring, weather forecast, and other diagnostic pages.
Module Pages
Most modules have some web interface content available to them. The camera module has a page to display previews of all security cameras, the thermostat module has pages to change the current thermostat settings, the Z-wave module has a page to list all current Z-wave devices.
The python source for a module defines each of the available pages on the web interface. Each page must have an html file stored in the module’s web directory.
If a module doesn’t have any pages defined, the module index page will simply display a list of all items within the module.
Widgets
I created a widget interface to streamline using web interface controls for devices in multiple different pages on the web interface. Widget code is defined in a special “item.html” file for a given module, and the item code generates the HTML for the widget depending on the function of the device.
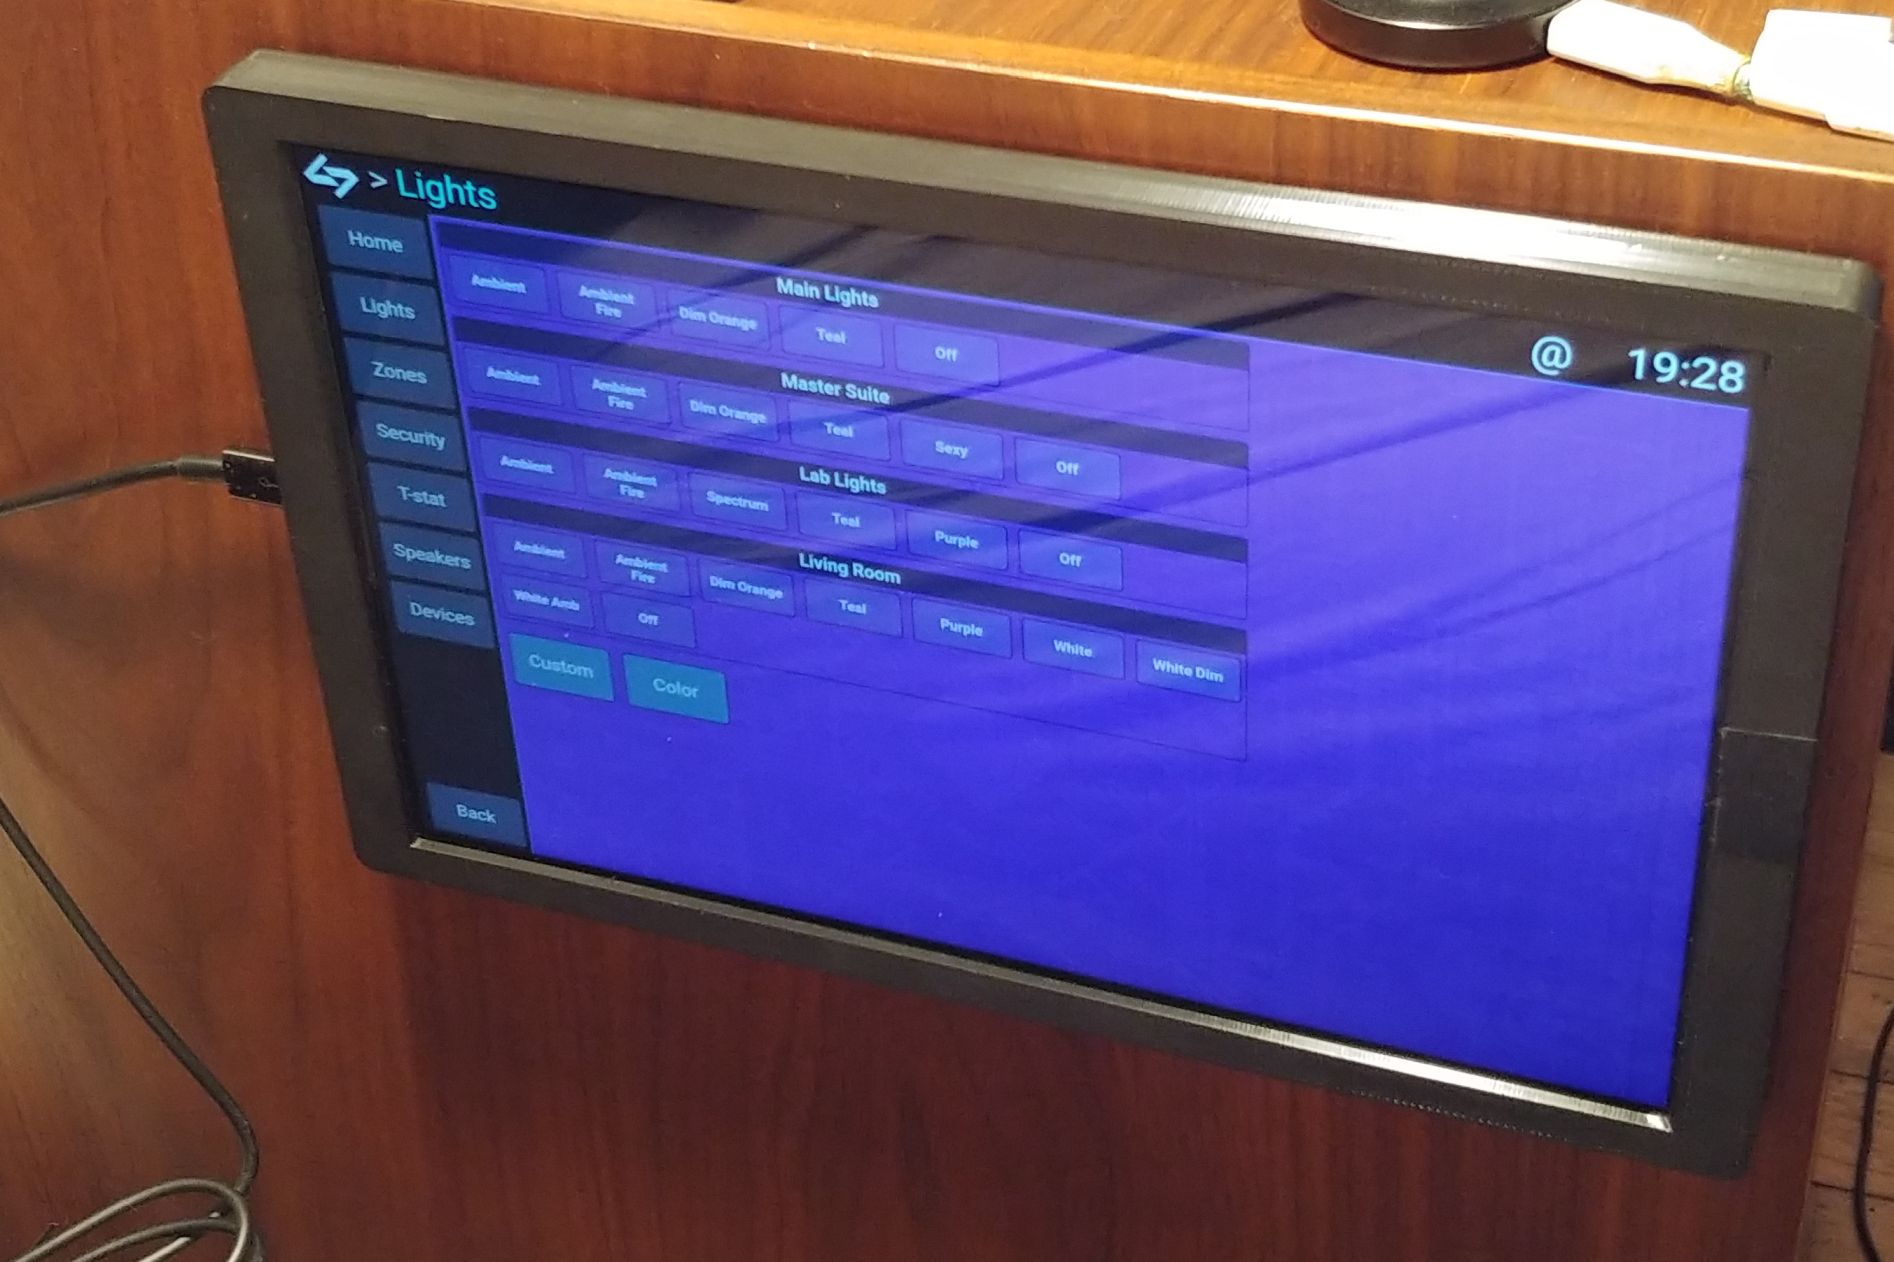
Zone pages make the most use of widgets. When you navigate to a zone page, the only native content is a list of each item. The web interface will iterate through all items in the list, and for each item that has a widget available, the widget will be rendered. A zone with multiple light switches configured will show each light switch as a toggle control.
For example, the z-wave module has widgets in item.html for both on/off light switches as well as dimmer switches. For each z-wave item that is an on/off switch, an on/off selector will be rendered. And for each dimmer switch, a widget with a slider control and static on/off buttons will be rendered.
Wireless Sensors and Devices
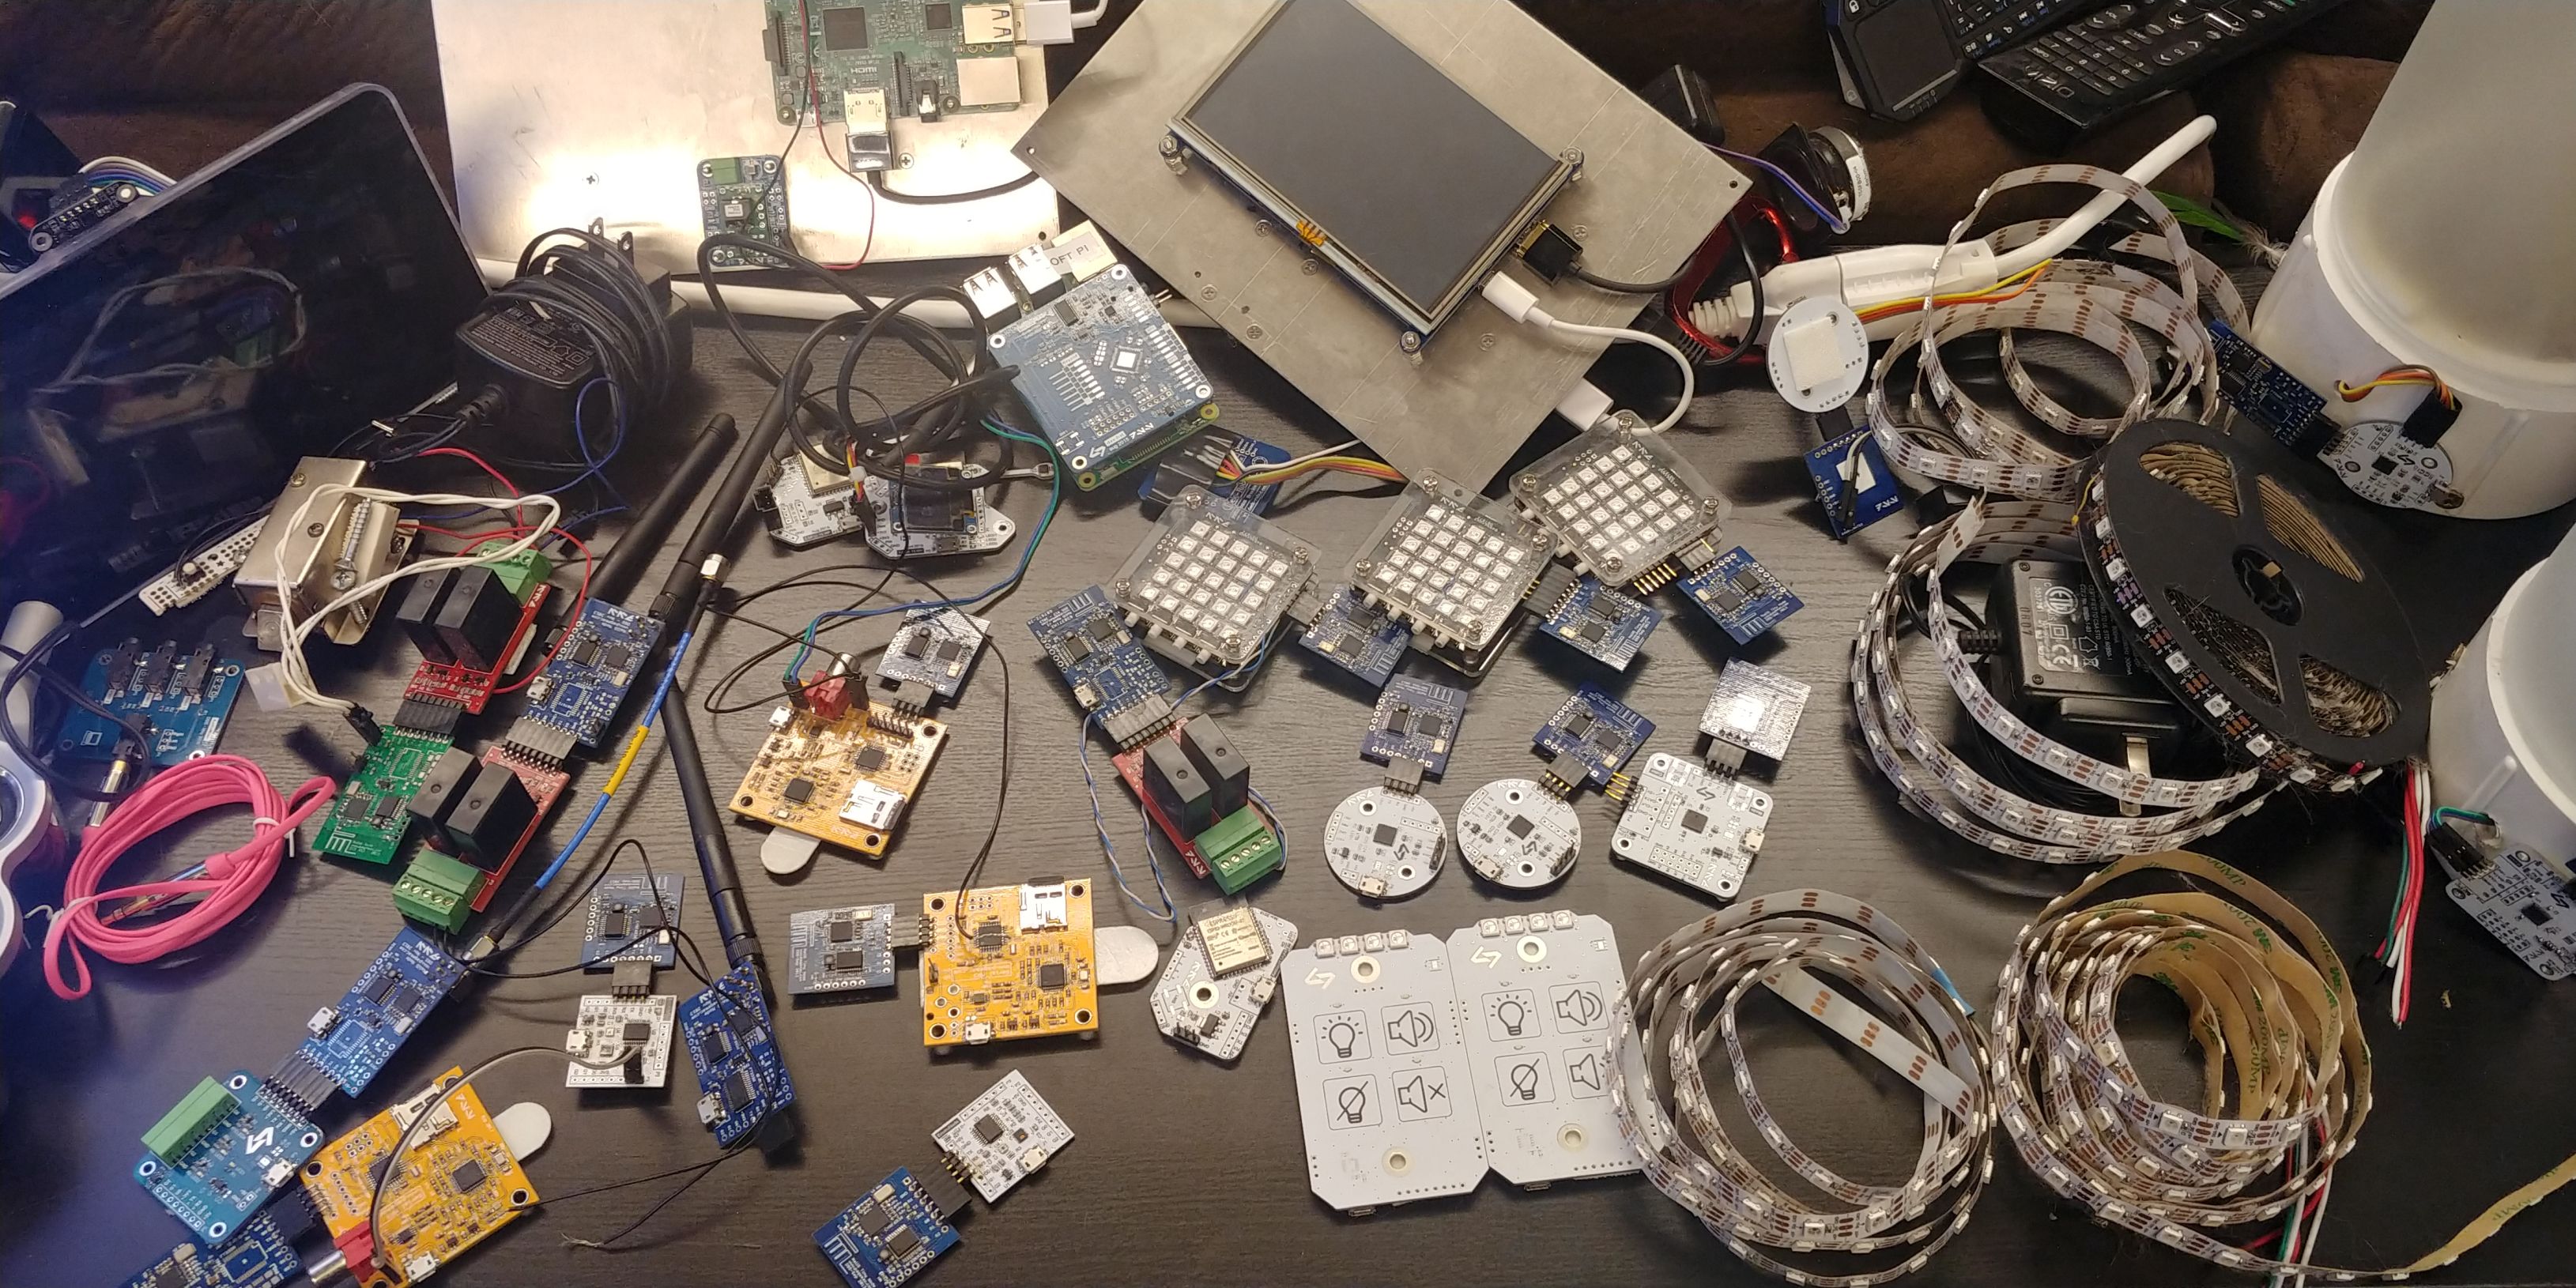
The DAX system at my house uses three different types of wireless sensors: Custom Nalig devices from my previous system, custom DAX MQTT devices designed specifically for this system, and commercial Z-wave products. DAX also talks with some other devices over ethernet and serial.
Nalig Devices
Nalig devices are custom microcontroller devices based on a PIC24 and CYRF6936 transceiver that communicate over a custom 2.4 GHz protocol. The nalig module communicates with the master device over a serial connection and maintains constant contact with the nalig sensors. The module requires a nalig master device to be connected over USB. Each nalig device is represented as a DAX item in the nalig module.
Nalig devices include ambient RGB lights, serialMP3 speaker modules for chimes, LED CP devices for security status, environmental sensors for temperature/humidity and light tracking, and magnetic door contact sensor monitoring. Read more about nalig devices.
DAX ESP32 MQTT Devices
DAX ESP32 devices are custom microcontroller devices based on the ESP32 that communicate over WiFi and MQTT. The daxMQTTdeviceHost module manages connectivity to these devices using different MQTT topics and requires an MQTT server address to operate. Each DAX ESP32 device is represented as a DAX item in the module.
DAX ESP32 MQTT devices include ambient RGB lights, daxAudio speaker modules for chimes, daxSwitchpanel devices for remote control, and others. Read more about DAX ESP32 MQTT devices.
Z-Wave Devices
DAX can communicate with Z-wave devices over MQTT with the help of zwavejs2mqtt and a USB Z-Wave dongle. Although I originally intended to write my own interface so that DAX could communicate directly to the USB Z-wave dongle, in the interest of time and moving the project along, I decided this solution would work best for now. I use an Aoetec Z-wave USB dongle, but any USB dongle that is compatible with zwavejs2mqtt would work.
The daxZwave module is configured with the MQTT topic prefix, and then subscribes to the device topics for each device that is configured in DAX. This does require two configuration steps to register a device - first the device needs to be included into the network with the zwavejs2mqtt interface, then the device ID and device type need to be configured in DAX. From there, DAX will get all the information about the device and send commands to the device over MQTT. Each Z-wave device is an item in the daxZwave module.
In order to integrate Z-wave parameters and commands with the DAX command interface, DAX combines the Z-wave command class, Z-wave instance number, and value name into a single configuration value at the item level. If the status of the device changes remotely, the configuration value will be updated when the data is received over MQTT. For example, a light switch is usually controlled with Z-wave command class 37 and the value name “targetValue”. In DAX, this translates to a configuration name of “37-0-targetValue”.
So far, I have implemented device handlers for light switches, dimmer switches, door locks, door/window magnetic sensors, motion sensors, and scene controllers. This module can easily be expanded to support any Z-wave devices that are supported by zwavejs2mqtt.
Thermostats
The current thermostat module operates with my Radio Thermostat CT-50 that was inherited from my previous system. However, this product is discontinued, so I am searching for a new thermostat option with a local API. The local API is very important - it allows me to continue controlling my thermostat using DAX, even though the manufacturer’s app has been shut down.
Cameras
The daxCamera module accesses cameras over HTTP and RTSP. It regularly polls cameras to make sure they are online and shows the current live image for each camera.
I use an external camera management software like Frigate or Synology SecurityStation to view historical camera footage and alerts. In the future, I hope to bring more functionality to this module by monitoring alerts from Frigate.
Speaker System
For whole-house audio, I installed a DAX66 6-Source, 6-Zone Distributed Audio System. This amp has 6 audio inputs and drives 6 pairs of speakers that are wired in various places in my house. (incidentally, the name “DAX66” is a total coincidence with DAX Home Automation)
The amp also has an RS-232 serial port so that it can be remotely controlled. The lovingly-named daxDAX66ctl module communicates with the amp to turn various channels on/off, set volume/mute, and change the input source.
The first input source on the DAX66 is connected to the audio output of DAX Home Automation. This allows the daxAudio module to play notifications or other sound effects throughout the house.
Automation Modules
DAX has several built-in modules to help facilitate home management and automation.
Scripts
Scripts are a series of text commands. In the scripts module, each item contains the script text and memory of when and how it has been executed recently. When a script is executed, DAX processes the input text and executes the commands in order. Commands are separated by a semicolon or newline.
Additionally, scripts support conditional if statements that allow some commands to only execute if certain conditions are met. Conditions can use data from variables in any other DAX module.
The scripts module interface shows all current scripts and allows manual, immediate execution of the script. Scripts can be executed by calling the command “scripts.run name <scriptname>”.
Triggers
Triggers are descriptions of events that are bound by defined conditions. In the triggers module, each item contains the type of event, the condition for when the event should be triggered, and the action that should be performed when the condition is met.
For example, the most basic event type is “time” and the condition is the daily time when the event should be executed. Another event type is “keyfob”, and the condition is the button and source address of the remote keyfob.
GPIO
The GPIO module is a more advanced trigger module that allows module items to be evaluated to be in a “high” or “low” state and perform different actions for each of those states. In the GPIO module, each item contains the module to monitor, the device ID within that module, the device pin or characteristic to monitor, the value required for the pin/characterstic to be “high”, the value required for the pin/characteristic to be “low”, and the labels and commands for high and low values. The item also has boolean values to determine if a log message or e-mail should be dispatched when the state changes.
This module is currently used for nalig multi-pin monitoring (for monitoring wired magnetic door contacts) and for monitoring z-wave states for door sensors, motion detectors, and scene controllers.
Here are a few examples of GPIO items and their configuration values.
| GPIO Parameter | Nalig Door Sensor Config | Z-wave Door Sensor Config |
|---|---|---|
| module | nalig | zwave |
| devID | 20 | 5 |
| pin | 1 | 113-0-access_control/door_state |
| object_type | Door | Door |
| high_state | Open | Open |
| high_value | 1 | 23 |
| high_cmd | scripts.run name door_open | scripts.run name door_open |
| low_state | 0 | 22 |
| low_value | Closed | Closed |
| low_cmd | scripts.run name door_closed | scripts.run name door_closed |
Zones
The Zones module is designed to classify other module items into groups of items that are physically in the same room or area. Every DAX item has a configuration field that allows a zone name to be selected. In the zones module, each item contains only the name of the zone and the name of an icon to display on the web interface. Some examples of zones that I use are bedrooms, kitchen, backyard, etc.
Grouping items into zones makes it easier to control multiple items at the same time. For example, there are zone commands to turn on all lights in a zone, or set all ambient lights in the room to the same color.
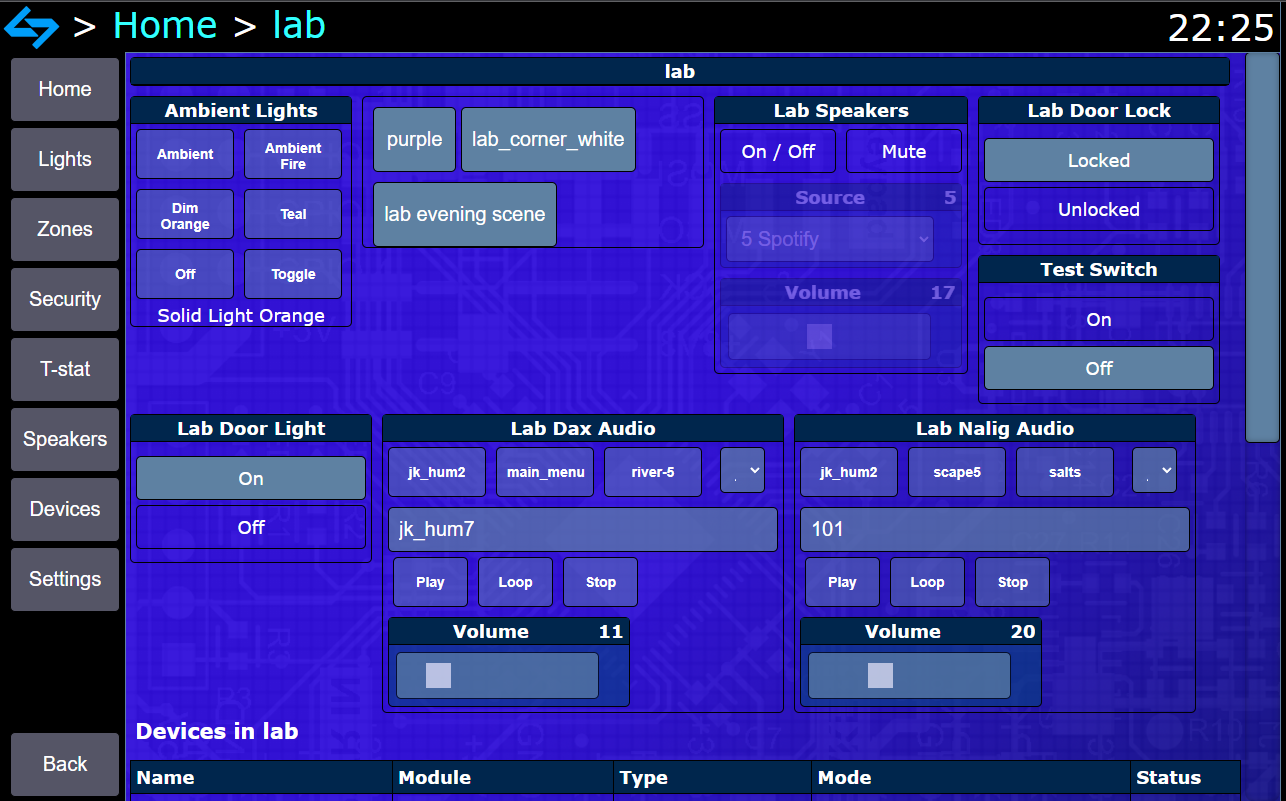
Zones are also helpful on the web interface. Each zone has its own screen with the widgets on the screen auto-generated for each item in the zone.
Page Tools
