Sidebar
Table of Contents
OpenVPN on Raspberry Pi
This tutorial assumes you are comfortable with your Raspberry Pi, using the terminal, and configuring your home router.
These instructions will assume the following setup:
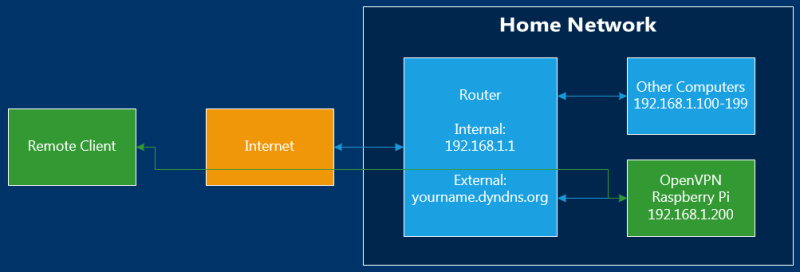
The Raspberry Pi should have a static IP address, 192.168.1.200. Or, configure the router to assign a static IP to the Pi's MAC address.
The default router/gateway IP is 192.168.1.1.
You will need to configure port forwarding on your router. The default configuration uses UDP Port 1194, but you can use TCP and/or change the port number.
You probably want some kind of dynamic DNS / domain name so that you can easily access your home network remotely. However, you can set that up or change it later. At the very least, you will need to know your router's current external IP address.
This setup was tested on Rasbian.
Install OpenVPN
Make sure everything is up to date:
sudo apt-get update
sudo apt-get upgrade
sudo apt-get dist-upgrade
Become root
sudo bash
Download and install OpenVPN
apt-get install openvpn
Copy default Easy RSA Config files:
mkdir /etc/openvpn/easy-rsa
cp -r /usr/share/doc/openvpn/examples/easy-rsa/2.0/* /etc/openvpn/easy-rsa
cd /etc/openvpn/easy-rsa
Modify Easy RSA Example
Open /etc/openvpn/easy-rsa/vars for editing
nano vars
Find and change EASY_RSA variable:
export EASY_RSA=”/etc/openvpn/easy-rsa”
Optionally, change some other certificate variables:
export KEY_COUNTRY="US"
export KEY_PROVINCE="CA"
export KEY_CITY="CITY"
export KEY_ORG="ORG"
export KEY_EMAIL="email@domain.com"
You can also change the KEY_SIZE from 1024 to 2048 if you want to increase security to paranoia level.
Build Certificate Authority
Build the certificate authority root certificate and root certificate authority key. Enter anything when asked for input
source vars
./clean-all
./build-ca
Build Server Key Pair
Build the OpenVPN Server key pair. OpenVPN-Server can be replaced with any name, but must match Common Name when prompted.
./build-key-server OpenVPN-Server
When asked for input, enter anything except for the following:
- Common Name [OpenVPN-Server]: (Must match ./build-key-server option)
- A challenge password? []: (Must be blank)
- Sign the certificate? [y/n]: y
- 1 out of 1 certificate requests certified, commit? [y/n] y
Build client key pairs
Build client key pairs. UserName can be replaced with any name, but must match Common Name when prompted
./build-key-pass UserName
When asked for input, enter anything except for the following:
- Common Name [UserName]: (Must match ./build-key-pass option)
- PEM Pass Phrase? []: (VPN password for user)
- A challenge password? []: Must be blank
- Sign the certificate? [y/n]: y
- 1 out of 1 certificate requests certified, commit? [y/n] y
Now generate the private key. You will be prompted to enter the VPN password again.
cd keys
openssl rsa -in UserName.key -des3 -out UserName.3des.key
cd ..
Repeat all steps in this section for every client.
Finish Generating Keys
Go back to easy-rsa directory
cd /etc/openvpn/easy-rsa/
Generate Diffie-Hellman parameters. On a Raspberry Pi 2, this takes about 5 minutes.
./build-dh
Generate the OpenVPN HMAC Key
openvpn --genkey --secret keys/ta.key
OpenVPN Server Config File
Create and open /etc/openvpn/server.conf. Use the code below as a template, and keep the following in mind:
- Change “local” to your Raspberry Pi's IP address, if different than 192.168.1.200
- Change “proto” from udp to tcp if you want to use TCP (default UDP is fine for most people)
- Change “port” to whatever you want. 443 works well for TCP (1194 is fine for UDP)
- Change “cert” and “key” files, if your server is named different than OpenVPN-Server
- Change your local subnet, if different than 192.168.1.0
- Change your DNS server if different than 192.168.1.1
nano /etc/openvpn/server.conf
local 192.168.1.200
dev tun
# you can also use tcp or change the port number
proto udp
port 1194
ca /etc/openvpn/easy-rsa/keys/ca.crt
# If you named your server different than OpenVPN-Server, change the next two lines
cert /etc/openvpn/easy-rsa/keys/OpenVPN-Server.crt
key /etc/openvpn/easy-rsa/keys/OpenVPN-Server.key
dh /etc/openvpn/easy-rsa/keys/dh1024.pem
server 10.8.0.0 255.255.255.0
# server and remote endpoints
ifconfig 10.8.0.1 10.8.0.2
# Add route to Client routing table for the OpenVPN Server
push "route 10.8.0.1 255.255.255.255"
# Add route to Client routing table for the OpenVPN Subnet
push "route 10.8.0.0 255.255.255.0"
# Your local subnet.
push "route 192.168.1.0 255.255.255.0"
# Set primary domain name server address to your router
# If your router does not act as a DNS server, you can use Google DNS 8.8.8.8
push "dhcp-option DNS 192.168.1.1"
# Override the Client default gateway by using 0.0.0.0/1 and
# 128.0.0.0/1 rather than 0.0.0.0/0. This has the benefit of
# overriding but not wiping out the original default gateway.
push "redirect-gateway def1"
client-to-client
duplicate-cn
keepalive 10 120
tls-auth /etc/openvpn/easy-rsa/keys/ta.key 0
cipher AES-128-CBC
comp-lzo
user nobody
group nogroup
persist-key
persist-tun
status /var/log/openvpn-status.log 20
log /var/log/openvpn.log
verb 1
Configure Raspberry Pi Networking
Open /etc/sysctl.conf for editing
nano /etc/sysctl.conf
Find and uncomment the following entry:
net.ipv4.ip_forward=1
Save and close. Apply the changes with the following command:
sysctl -p
Create /etc/firewall-openvpn-rules.sh
nano /etc/firewall-openvpn-rules.sh
Enter the following and save. Make sure to change 192.168.1.200 to your Raspberry Pi's IP address if needed.
#!/bin/sh
iptables -t nat -A POSTROUTING -s 10.8.0.0/24 -o eth0 -j SNAT --to-source 192.168.1.200
Change permissions an ownership of this file to root.
chmod 700 /etc/firewall-openvpn-rules.sh
chown root /etc/firewall-openvpn-rules.sh
Open /etc/network/interfaces for editing
nano /etc/network/interfaces
Find the line for iface eth0 and insert this indented line immediately below
iface eth0 inet manual
        pre-up /etc/firewall-openvpn-rules.sh
Finally, reboot.
sudo reboot
The server configuration is now complete!
Client Configuration
For each client that you generated key-pairs for, you need to create an OpenVPN client configuration file.
Create and open /etc/openvpn/UserName.ovpn for editing. Use the template below, and make the following changes:
- Make sure proto matches server config
- Make sure remote hostname is correct and port matches server config
- Insert the contents of ca.crt into the first certificate block
- Insert the contents of UserName.crt into the second certificate block (only the certificate block, not the meta-data)
- Insert the contents of UserName.3des.key into the RSA Private Key block
- Insert the contents of ta.key into the TLS static key block
nano /etc/openvpn/UserName.ovpn
client
dev tun
proto udp
remote yourname.dyndns.org 1194
resolv-retry infinite
nobind
persist-key
persist-tun
mute-replay-warnings
ns-cert-type server
key-direction 1
cipher AES-128-CBC
comp-lzo
verb 1
mute 20
<ca>
-----BEGIN CERTIFICATE-----
### REPLACE THIS LINE WITH CONTENTS OF ca.crt #####
-----END CERTIFICATE-----
</ca>
<cert>
-----BEGIN CERTIFICATE-----
### REPLACE THIS LINE WITH CONTENTS OF UserName.crt #####
-----END CERTIFICATE-----
</cert>
<key>
-----BEGIN RSA PRIVATE KEY-----
### REPLACE THIS LINE WITH CONTENTS OF UserName.3des.key #####
-----END RSA PRIVATE KEY-----
</key>
<tls-auth>
#
# 2048 bit OpenVPN static key
#
-----BEGIN OpenVPN Static key V1-----
### REPLACE THIS LINE WITH CONTENTS OF ta.key #####
-----END OpenVPN Static key V1-----
</tls-auth>
Now, save this file and securely transfer it to the client.
Remove the following files from the Raspeberry Pi Server and store securely offline.
- ca.key (Root certificate authority key)
- UserName.key (UserName certificate)
- UserName.3des.key (UserName private key)
- UserName.ovpn (OpenVPN Client Configuration file)
Repeat this process for all VPN users.
You can now use this .ovpn client file to connect to the OpenVPN server. On your client machine, just type openvpn UserName.ovpn, enter your password and it should connect. When using Windows, make sure you use an Administrator console.
Other Tutorials
If you get stuck, here are some other tutorials that basically describe the same process.
Page Tools
